When a customer on-boards to Office 365 they usually already have local installations of Office, either volume licensed or perhaps even OEM licenses that came with their computers. Sometimes there’s an immediate need to install new Office client applications due to compatibility issues with the older versions already running on the PCs, and other times the business is willing to take a slower approach, either performing the deployment in smaller groups, or by installing it as new PCs are purchased to replace older hardware.
In mid-size organizations the deployment of Office 365 clients to computers is a larger task than can be reasonably performed with manual installs. And manual installation is also tedious and repetitive. But often the same organizations don’t have a software deployment platform such as Config Manager available to use.
For simple deployment scenarios it’s fairly easy to just set up a file share on the network and automate the deployment from there using a script. In this article I’ll break down the process and show you how it’s done.
For more complex scenarios, you might be interested in the Office Deployment Scripts for IT Pros. In fact, you might even be wondering why I’m about to show you a different method, instead of just making use of those deployment scripts. The reason is that the Office deployment scripts, while certainly very powerful and flexible, can take you quite a bit of time just to learn how to use them. Using those scripts will be the subject of a future blog post here. In the mean time, if you’re just looking for a quick path to victory, read on below.
This tutorial assumes that you’ll be deploying an Office 2016 build of Office 365 (either ProPlus or Business).
Preparing a Network Share
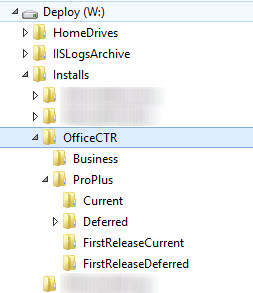
To begin with, create a shared folder on your network that will be used to distribute the Office 365 client software. For this example the server MGMT is hosting a share named “Installs”. Within the shared folder a sub-folder of OfficeCTR has been created, and then sub-folders for each update channel. If you only plan to use one specific channel, such as Deferred, then you don’t need to create the others. Users or computers will need read access to the share and the folders within. The Authenticated Users group is usually sufficient, or you can setup a specific group if you prefer.

Creating a Configuration XML File
Download the Office Deployment Tool (ODT) for Office 2016. When it has downloaded, launch the file and extract the ODT to a folder on a computer that you will use to download the Office 365 client setup files from Microsoft’s content delivery network (CDN). I usually just place it in the folder where the Office applications will be deployed from.
Next, create a configuration XML for your deployment. The XML file details the configuration that the Office Deployment Tool should deploy to the computer. You can use the configuration XML to control variables such as which applications are included in the Office install, which update channel the computer will use, languages, specific build numbers, and more. There are two tools you can use to create the XML file:
- The Office configuration XML editor hosted on GitHub by the Microsoft Office team.
- The newer config.office.com web app.
Both tools work fine right now. It’s possible the GitHub-hosted tool will be removed in future, and Microsoft might focus on the config.office.com tool. For now, I will keep using the Office configuration XML editor for this demonstration.
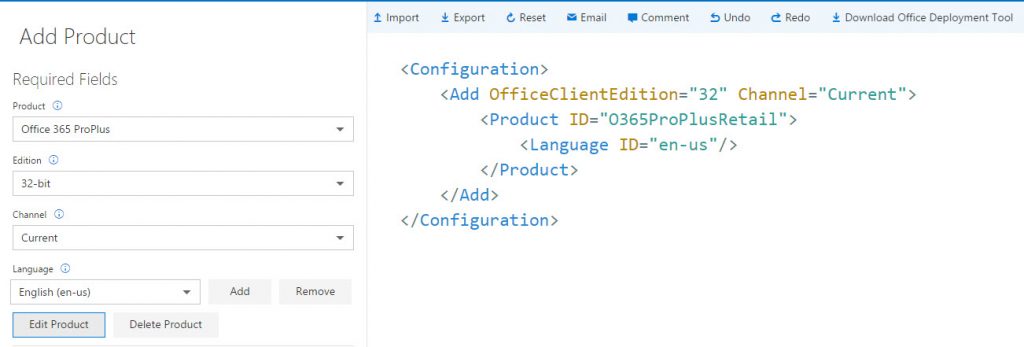
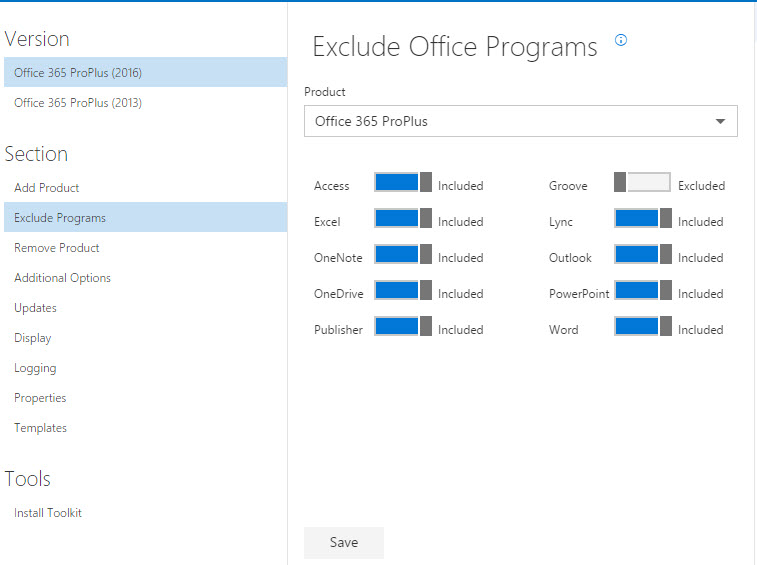
Build the XML file by starting with the version of Office you’ll be deploying (in this tutorial it is 2016), selecting ProPlus or Business, the “bitness” (32 or 64), channel, and language. Click Add Product to add your selection to the XML file.
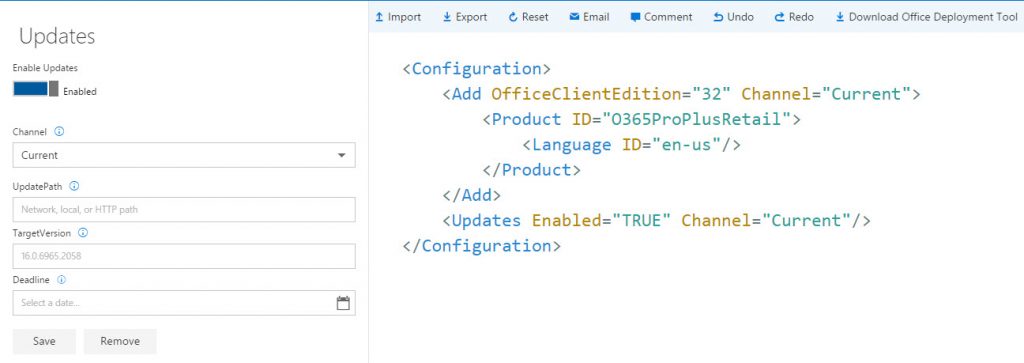
Continue on to the Updates section, and configure how you would like your Office 365 clients to update. You can simply enable updates and choose the channel, and leave the other fields blank if you want your clients to download updates from Microsoft’s CDN. If you’d prefer to set up a local network share for hosting update files, you can configure those options now, or you can set or modify the update settings later using Group Policy if you change your mind. Keep in mind that if you choose to self-manage the update files on your network, that’s going to create additional work for you in the long term, and you do need to keep your clients updated because Microsoft doesn’t provide security updates or support for builds that are too far out of date. The Deferred channel with automatic updates is a good choice if you want to reduce your workload but also keep your users away from the very latest builds.
One option I do recommend you look at is excluding Groove (the legacy OneDrive for Business sync client, also known as groove.exe) from your deployment. The new OneDrive client has replaced it and is far more reliable.
For the rest of the sections in the XML editor there’s nothing required, but you might like to explore the logging options or compare your XML file to the templates that Microsoft provides. You may notice the Display options such as Accept EULA. For a GPO-drive deployment using a startup script, which is what I’ll be demonstrating here, that option has no effect. If you plan to run the install using the credentials of a logged on user, you could look at enabling that option so they don’t need to accept the EULA.
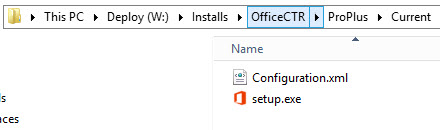
When you’re ready, copy the XML code and save it as Configuration.xml along with the ODT setup file on your deployment share.
Download the Office 365 Client Setup Files
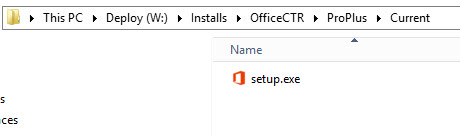
Now it’s time to download the Office setup files. Open a command prompt and navigate to the folder containing the setup and configuration files. Run the following command to begin the download. Because no source path was configured in the XML file, the Office files will be downloaded to the same folder where setup.exe is being run.
W:\Installs\OfficeCTR\ProPlus\Current>setup.exe /download Configuration.xml
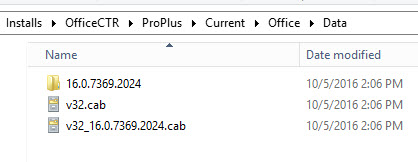
ODT will begin download the Office setup files, which add up to about 1.3GB for this demonstration.
Configure the Deployment Script
For this demonstration I’m using a computer startup script in a Group Policy to install the Office 365 client applications. But before I get into that, here’s what the installation command line looks like if you just wanted to write a quick batch file.
start /wait \\mgmt\installs\OfficeCTR\ProPlus\Current\setup.exe /configure \\mgmt\installs\OfficeCTR\ProPlus\Current\configuration.xml
That will basically do the job, but if you were to assign that as a startup script it would run at every startup and try to reinstall Office each time. Checking for existing Office installs first would be ideal. Microsoft’s Office deployment scripts have a solution for that, as well as for removal of existing Office versions if they’re detected. But for this simple scenario, some script logic to install Office to a new computer at startup, and then not try to install again after that, should be enough.
So for this demonstration I’ll use Install-OfficeCTR.ps1, a PowerShell script that I’ve used for small to mid-size customer projects in the past.
Install-OfficeCTR.ps1 uses the following parameters:
- InstallRoot – Specify the UNC path to the network share that hosts the Office 365 setup and configuration files.
- SKU – Specify the the Office CTR SKU to deploy (e.g. ProPlus, Business)
- Channel – Specify the build channel to deploy (e.g. Current, Deferred)
The three parameters are used by the install script to locate the appropriate setup and configuration files in your install share on the network. For example:
.\Install-OfficeCTR.ps1 -InstallRoot \\mgmt\Installs\OfficeCTR -SKU ProPlus -Channel Deferred
The example above will look for setup and configuration files in \\mgmt\Installs\OfficeCTR\ProPlus\Deferred.
The script and parameters can be configured in a Group Policy as a startup script.
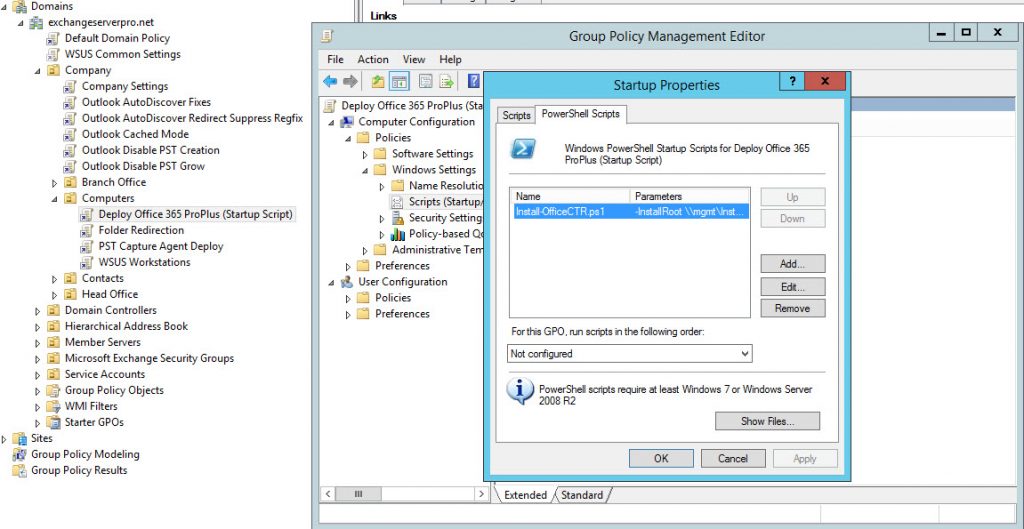
You can control which computers run the startup script by using the security filtering options for the GPO.

After assigning the GPO the computers should install Office 365 on their next restart, which (depending on how you do the security filtering) makes it easy to get it installed after a standard automated build process has joined the computer to the domain.

Summary
Automating Office 365 client application installs saves a lot of time when on-boarding a customer to Office 365. Although the Office deployment scripts from Microsoft provide a lot of flexibility for this task, there’s also a learning curve required to start using them effectively. For simple scenarios, creating your own configuration XML file and using the Office Deployment Tool to deploy from a network share via a basic scripted installation is often more efficient.


Found this post when looking for options to deploy O365 from a network share & followed as I have had great success with prior posts from Paul across SCCM & other systems.
Minor issue – MS have changed the update channel naming since this post & the PowerShell script has set values for validating the channel name supplied. Obviously didn’t work for me given I used ‘SemiAnnual’ for the folder per the new naming till I updated that line (the second “ValidateSet” command).
Changes to update channels:
https://docs.microsoft.com/en-us/deployoffice/update-channels-changes
Once this was sorted, worked perfectly.
Thanks again, Paul.
Hello, does this script check if an office is installed?
Hello. The scripts unfortunately don’t work on Windows 7 and Powershell 2.0.
The error message is (translated from french) :
“The script xxxx.ps1 can’t be executed, because it’ contains on line 44 an instruction <> for Windows Powershell 4.0. ….
FullQualifiedErrorId : ScriptRequiresUnmatchedPSVersion
Great post, worked perfect to create my own installers.
Hello Paul,
Thank you for all your help to us less experimented.
You said this: “Using those scripts will be the subject of a future blog post here”
Have you got a chance to write that for us?
How can this be doployed when users don’t have local admin rights?
The solution I’ve demonstrated in the article uses a computer startup script, so the script runs as SYSTEM on the computer will full rights to install software.
Hey Paul,
Thank you for your great description!
Unfortunately I am experiencing the same issue.
The PowerShell Script executes (GPO) the setup.exe – when this happens the domain user has to login with admin rights.
Do you have any ideas why this is happening?
Hi Experts,
I need to deploy Office 2016 to our domain, I’m 95% ready but need some advice.
During research I’ve seen:
setup.exe /configfile configuration.xml
setup.exe /adminfile configuration.msp
and
setup.exe /configfile configuration.xml /adminfile configuration.msp
Which is correct /best?
Thanks
MSP files can be applied when you are deploying the MSI builds of Office. This article covers the CTR (click to run) build, which uses an XML file for deployment configuration.
Hi Paul,
Yes I realised that. Apologies for double post!
I was thinking that as well, just use the same xml with the download switch. The reasoning I had was that if we wanted to deploy it with different options further down the line (Skype for business for example) we could just amend the install xml (with all our options set) to include Skype and it would work rather than download it fresh. Or is that totally wrong and in reality everything is downloaded and it only installs what is required…
Either way thanks for your help.
Sounds like something you can determine with some testing. If you download and install with the same XML and it works, but download and install with different XMLs doesn’t, then I guess you can draw a conclusion from that. I would assume that it should be fine with the different XMLs but I I haven’t run through that scenario myself (not that I can recall anyway).
Hi Paul,
This is the default configuration.xml:
And this is the One we use for installation xml:
The product is the same, there are differences (language/channel) but I didn’t think this would effect how the install xml works? My understanding was that the install xml will just take what it needs from the install source (local drive share). Is that wrong?
You’re not going to be able to post XML in the comments here. It will not display properly.
There’s no need to have separate XML files. You can download and install using the same XML file, it’s just different setup switches.
Hi Paul,
Your article is very helpful. However I have a question, we have been using a basic share with the files downloaded via the ODT config file and then we made our own version with our specific settings defined in a install.xml file to deploy from via a bat file. Manual I know but for now we are in pilot mode so it is fine and has been working fine. However we are finding that now we are deploying a version which is immediately out of date.
I ran the following command from the server that the share is on “Setup.exe /Download configuration.xml ” (default config) which I thought would just pull down the latest version of Office . However when I did the above I now get a message stating that “We can’t install the following product(s) can’t be installed at the same time: O365ProPlusRetail”.
When I look in the folder we deploy from there are two versions of office within the Data folder, 16.0.9029 and a new one 16.0.9226 which is the new one. I expected that I wouldn’t have to do anything other than download the latest and possibly delete the old files. I did that and it still failed! Am I missing something very obvious? Any help would be much appreciated.
Sounds like you’ve defined a different product in configuration.xml than the one defined in install.xml
Im missing some thing . when i open CMD and run
“W:\Installs\OfficeCTR\Pro Plus\Current>setup.exe /download Configuration.xml” I get an error,
of course my destination is slightly different but not sure what i am doing wrong
And what does the error say?
Will you b updating your script to match the new Channels , since deferred and such are no longer in use?
I have also noticed that when installing just Project and Visio the folder structure for the installation files is /Office/Data/…. (… = cabs and subfolders) with no mentioned or folder created to identify the channel in use.
Project and Visio will reside in the same folders as the main Office ProPlus. So if you see the root folder name where Office is, for example “16.0.8827.2148”, and this is wherein Visio/Project fell into, then that is their build number too.
If you happen to do /download for just Visio or Project for a version that there is no local Office ProPlus already downloaded, then a new folder like “16.0.8827.2148” will be created and in there will be just Visio and Project, but it will look just like Office ProPlus.
You can download all these things into the same place BTW, then just use different configuration files to install the portions you want. It’s definitely a little confusing this way but also kind of simplified at the same time.
Just think of Visio and Project as additional files within the main Office install, rather than actual fully separate products.
Also, I would do find/replace to the script and folder structure folder names to just update the channel names. 100% agree that the channel name changes was completely unnecessary and caused tons of people extra work. But at the same time (again:)) it keeps everyone on their toes and able to react quickly.
The channel updates are on a looong to-do list but not near the top. The Github repo is here (https://github.com/cunninghamp/Office-365-Deploy) if someone beats me to it and submits a PR with the changes.
Hi Paul,
Thanks so much for this brilliant time saver for trying to get Office deployed out, quick question in regards to updating from the shared folder. Once the install has been deployed how would updates be applied if I am choosing network share location?
Would I rerun the xml file generator and select the latest update, rerun the /download command and then push it back out via GPO again or is there a different way to approach this?
Yes, if you’re managing the updates yourself you’ll need to download them to the update share as well. I prefer to just let updates come from the Microsoft source.
From your experience what (if any) permissions do you need above basic domain user, to enable the automatic updates from Microsoft to work? I prefer to restrict users to the barest minimum so things dont suddenly break after some software appeared on their machines.
Documentation on how to do this is frustratingly non-existent. Any reason not to point updates to the same share/location it was deployed from? Seems that when you run ODT with /download, it creates a WW.X.YYYY.ZZZZ version-numbered sub-folder/file set anyway. Or is it supposed to pull updates down into the UpdatePath specified in the XML? Because if that’s what’s supposed to be happening – it isn’t. Unless there haven’t been any updates in several months, which I doubt.
Paul you are a bloody tech genius, saved me hours of messing around. Top Man!
Really sucks that this doesn’t actually work, and there are absolutely NO log files created to attempt to even try to troubleshoot. So frustrating, another MAJOR failure on Microsoft’s part.
What doesn’t work?
Hello,
is there a way to get this working for PowerShell 2.0?
I’m looking to deploy this on Windows 7 Machines that do not have PS4.0.
Thank you!
Which part isn’t working?
This is a great script. Curious, I could only get it working once I installed Powershell v4.0. Anyway to make the script v1.0 compatible?
PowerShell 1.0??? What OS are you running?
I´m trying to add this script to a GPO startup script but it wont run. I´m pointing to a network share where the script is. I´ve tried to set up the GPO with a dummy powershell script that creates a file in that network share and that works fine. Is there any permissions on the network share that your scripts need? Or what am I doing wrong? I´ve set the execution policy to allow all in that GPO.
Thanks,
Mikael
EDIT: I had forgot to give ‘domain computers’ permission on the folder where the xml was. I had only given that to the folder where the scripts was. It looks to be working now.
Adding to the xml also seems worthwhile as well to make it completely seamless not sure if anyone has had any success with that value? I was wondering if ADFS was a requirement for this to work?
Property Name=”AUTOACTIVATE” Value=”1″
Hi Paul,
Just wanted to let you know that I have used your Install-OfficeCTR.ps1 script and found it met my needs. I’ve since created my own script directly based off of it. It is definitely plagiarism so I’ve mentioned your work in my .Notes help section.
Here’s mine:
https://github.com/jrochet/OfficeDeployment/blob/master/Install-OfficeClickToRun.ps1
Thanks very much. If you’re not happy about any of this, let me know.
Jeremy
I publish scripts so people can use them and adapt them to their own requirements, and I usually use the MIT license (https://github.com/cunninghamp/Office-365-Deploy/blob/master/LICENSE). So it’s not plagiarism.
Thanks, just looking at this now for a mini project task before October 31st.