
Every Office 365 tenant with Exchange Online mailboxes has Exchange Online Protection (EOP), the cloud-based email anti-spam and anti-malware service. All inbound and outbound mail for Exchange Online mailboxes travels through EOP and is scanned for spam and malicious content, even if you use a third party scanning service or route mail through an on-premises Exchange server.
Although your Exchange Online mailboxes are protected by EOP automatically, the default configuration might not be suitable for your organization. The effectiveness of EOP is often debated. Some customers think it works fine, others are disappointed with the bad email that gets past it. Usually the missed emails are spam or phishing, but zero-day malware is also a risk.
At 400,000,000,000 messages scanned per month (according to Microsoft at Ignite 2017), even a small percentage of missed email adds up to a lot. Perfection is the goal, but realistically we’ll probably never achieve it. EOP is just one layer of defence after all. What we can do, as customers, is tune our EOP configurations to be as effective as we need them to be.
In this article I’ll walk through the EOP configuration options and demonstrate how I configure EOP for my customers. You should make your own decisions. You don’t need to agree with all of my advice. But I encourage you to review the settings and continue to adjust them over time until you’re happy with the results.
Accessing Exchange Online Protection Settings
The EOP configuration options are found in the Exchange admin center, in the Protection section. Different components of EOP are found in sub-sections of Protection. You can configure these options as a Global administrator or as an Exchange administrator for the tenant.
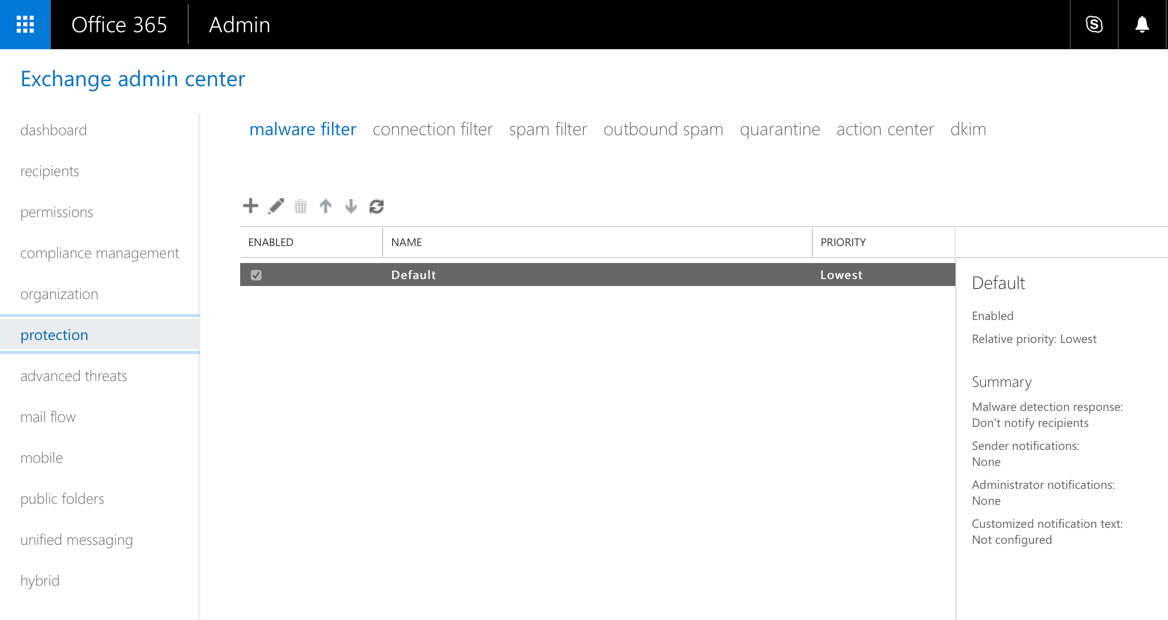
In each of the policy sections you’ll find a default policy that applies to your entire tenant. In some policy sections you can add your own policies that are scoped to specific recipients, specific domains, or members of a group. This allows you to have granular policies that apply different controls to different parts of your user population.
When you configure multiple policies they are given a relative priority. If no higher priority policy exists that matches an email, the default policy will be applied. For many customers just a single policy for each of the protection types is required. However, even in smaller organizations some exceptions to policies are desirable. For example, an inbound customer service address might want to have more lenient content filtering to avoid the risk of blocking a customer email, whereas higher risk parts of the organization may need more aggressive protection to reduce the risk of phishing and other attacks.
Also keep in mind as you’re reviewing your settings, it’s possible that your default settings are different to someone else’s default settings due to minor changes over the years in how new tenants are provisioned. Again, this highlights the importance of reviewing your EOP configuration and making decisions about what settings to apply.

Configuring Malware Policies
Exchange Online Protection scans email attachments for malware using multiple anti-malware engines, as well as Microsoft’s own detection rules based on their analysis of malware outbreaks.
The malware policy settings in EOP mainly provide for customization of notifications. There is an additional setting for blocking file types that are likely to be harmful. This setting might be disabled in your tenant by default. You can turn it on, and then review the default list of files types to be blocked. If you like you can also add or remove file types to customize the list. In the default list, the file type most likely to cause a problem at customers I’ve worked with is .docm (Macro-enabled Word document), due to the heavy use of Word macros in the industries I deal with most.
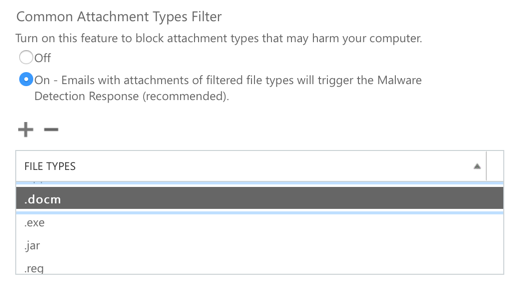
Removing file types from the list is not ideal, but some customers insist. The preferred approach, in my opinion, is to change from emailing macro-enabled Word documents around, and instead use the file sharing capabilities of OneDrive. But if a customer does insist on flinging macros around in email attachments, we can look at securing Office macros using Group Policy. This is a whole separate adventure of trying to come to grips with macro signing, trusted locations, and all the rest. It’s not easy, but it addresses a significant risk, and also protects against other sources of macro-based attacks such as file downloads from the internet.
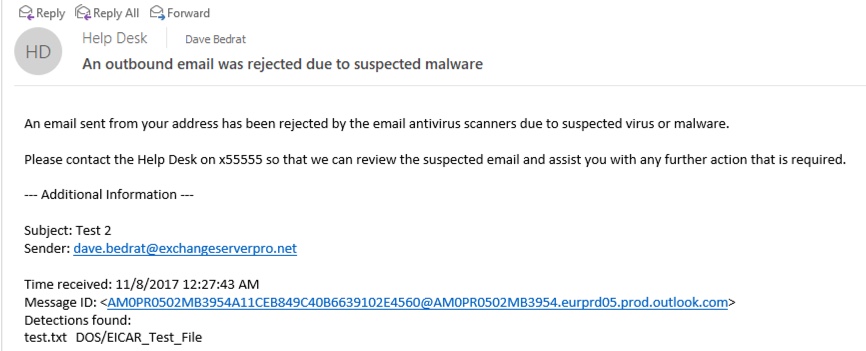
For malware notifications, I generally don’t turn on the notification to recipients. Malware tends to be malware, with very few false positives. Some customers have enabled it though, with the default notification text.
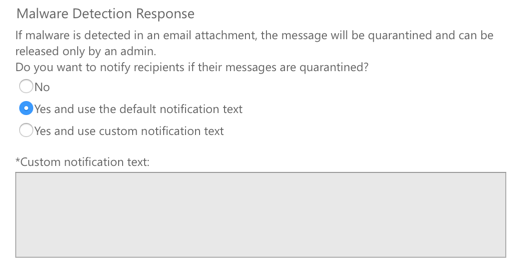
As notifications start to roll in, the customer can then craft a custom notification text that addresses the most common concerns or questions that their users ask when they receive a notification. The notification text is seen by the user in the text file attachment that replaces the infected file attachment.

For sender notifications, I recommend enabling notifications to internal senders only.
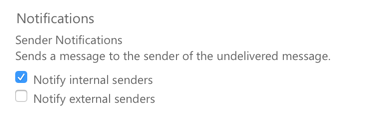
You can further customize the sender notifications as well, to provide more useful information to any senders in your organization who are the source of outbound malware.
Configuring Connection Filtering
Exchange Online Protection uses connection filtering to allow or block email based on the source IP address. Connection filtering is a good way to prevent spam and malware being received from known bad neighborhoods, such as the IP address ranges of residential ISPs where home computers can be infected by spam botnets.
There is one connection filtering policy that you can modify with specific IPs to allow or block.
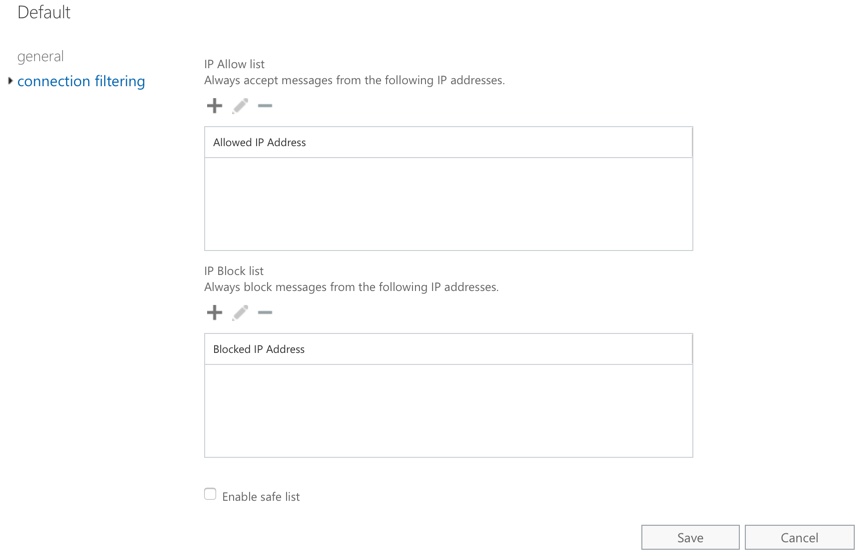
In most cases I don’t make any changes to these settings. If the customer has an externally hosted system that sends inbound email, and IP address is the only characteristic of the emails that we can use to allow it, then we’ll add the IP to the allow list in the connection filtering policy. From time to time there will also be a need to add IP addresses to the block list if there’s a sustained attack that other layers of spam or malware protection are not accurately blocking.
There is also the option to enable the safe list. Microsoft subscribes to various third party lists of trusted senders. There’s not much more detail available, and if your security teams don’t like to trust unknown lists of senders, then you can ignore this setting. I’ve found it useful to enable this option as a way to decrease the risk of legitimate email being blocked when other spam filtering settings are configured more aggressively.
IP allow/block lists configured in connection filtering apply to your entire tenant, and EOP doesn’t allow you to create additional connection filtering policies. If you have more granular IP-based filtering requirements, use a mail flow rule (transport rule) instead.
As a final note on connection filtering, if you’re using a third party email security service to filter email before it arrives in EOP, then you might be reducing the effectiveness of EOP. You can find out more in this discussion with Microsoft MVP Brian Reid.
Configuring Spam Filtering
Spam filtering in EOP makes decisions based on the content of emails. The spam filtering options provide some of the most detailed customization available to you in EOP.
Incoming email is assigned a “spam confidence level” (SCL) when it has been scanned by EOP. The SCL ratings are published on TechNet, and are as follows:
- -1 for non-spam coming from a trusted source (e.g. IP allow list)
- 0-1 for email determined to be non-spam
- 5, 6 for email determined to be likely spam
- 7, 8, 9 for email determined to be high confidence spam
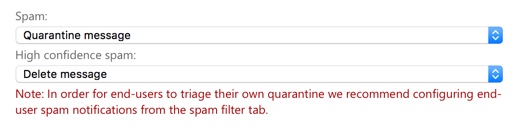
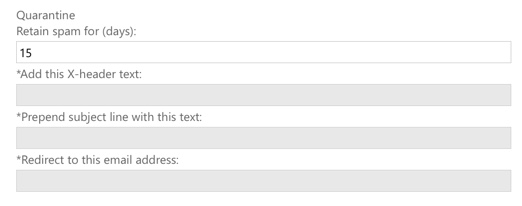
The default for likely spam and high confidence spam is to deliver to the recipient’s junk email folder. However, there are multiple actions you can choose from when spam is detected:
- Move message to Junk Email folder (default setting)
- Add X-Header (adds a entry to the message headers that you can then use for mail flow/transport rules)
- Prepend subject line with text (useful for flagging to end users that an item is suspected spam)
- Redirect message to email address (useful if you want to look at all the spam you’re blocking)
- Delete message (when you’re really sure you won’t miss legitimate email)
- Quarantine message (when you’re not confident enough to delete the messages)

Customers tend to fall into two categories:
- Those who want to send suspected spam to Junk Email, and quarantine the high confidence spam
- Those who want to quarantine suspected spam email, and delete the high confidence spam
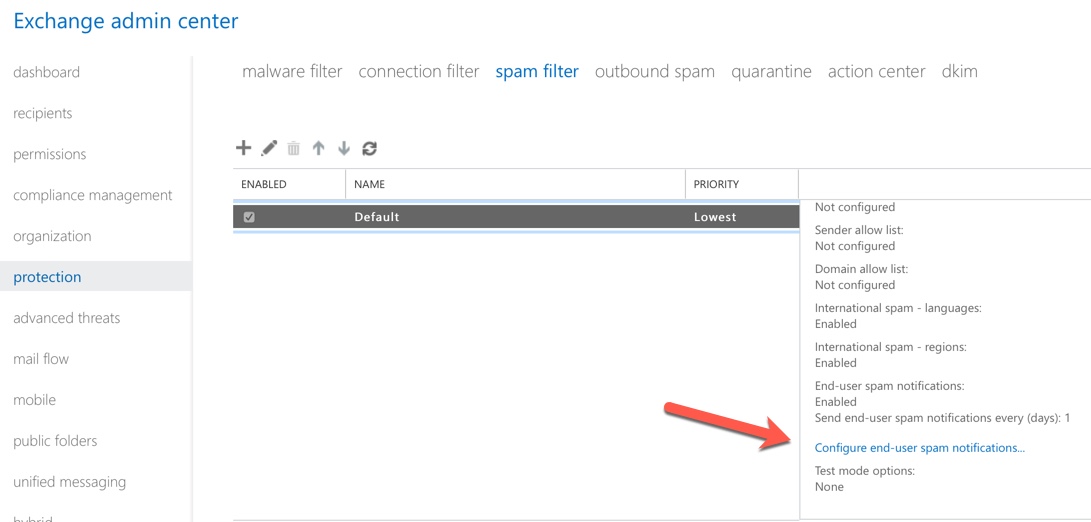
Very few customers that I work with mess around with X-Header or subject line insertion. If you do choose to quarantine spam, it’s recommended that you configure end-user spam notifications, which we’ll look at shortly.
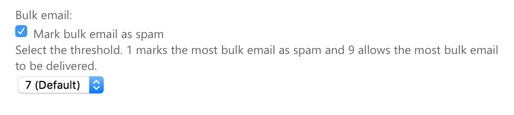
The next spam filtering setting to review is the handling of bulk email. Bulk email is usually not spam. It’s often referred to as “grey mail”. Bulk email is things like newsletters, marketing emails, anything that is sent out in bulk to a large audience. Transaction email such as receipts for online shopping is usually not considered bulk email, but might be treated as such if it comes from the same IP address pools.
I recommend treating bulk email as spam, and setting a high BCL value. The BCL (Bulk Complaint Level) is the number of spam complaints that a bulk email service generates. When recipients of newsletters and other marketing materials hit the equivalent of a “This is spam” button in their mail client, a spam complaint is registered against that sender. Bulk email services that allow their customers to generated a lot of complaints without terminating their service will end up with a poor reputation in the eyes of filtering systems like EOP. Reputable bulk email services work very hard to maintain their reputation, but there are others that are happy to take money from the less than ethical marketers of the world.
I generally leave the bulk email threshold to the default value of 7. Most customers operate in industries that have some form of marketing or professional newsletters that they want to receive. Users can be encouraged to add senders to their safe list if any of the newsletters that they want to receive are getting marked as spam. In a few cases I’ve worked with customers who discourage the use of work email addresses for any type of marketing or newsletter, and configure the bulk email threshold to a lower value to block as much of it as possible. Users are encouraged to use a personal email address for any newsletters they want to receive. I would argue that this doesn’t really solve the problem, since users can usually still access their personal email from work anyway.
For quarantined item retention, you can set this to whatever you like really, since it’s Microsoft’s job to store it all. The maximum duration is 15 days, but you don’t save any money by changing it to a lower value.
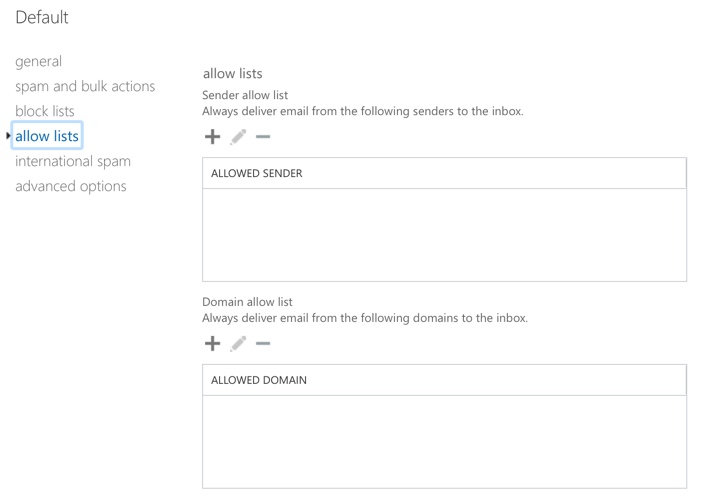
Spam filtering also has block lists and allow lists available for you to explicitly allow/block email addresses or domains. Using block lists is a game of whack-a-mole, but I’ve had customers who blocked emails from the major social networks (Facebook, LinkedIn, Twitter, etc). The goal was to reduce distractions if an employee happened to sign up to one of those networks using their work email. Allow lists are a little more useful for making sure that emails from a domain or specific sender are not blocked by the spam filters. Customers of mine tend to use this for any emails that they absolutely must receive emails from, such as emails with new bids or grants notifications.
The international spam filter options have been quite effective in reducing spam for local businesses that I have worked with. If they have no global operations at all, and don’t speak or read any other languages, then there’s usually no reason to accept email written in other languages. Filtering email from other countries or regions gets a little tricker, because there’s always the possibility that a local customer is using an email server hosted in some other part of the world. For region blocking I usually recommend to build the list up over time as any problematic spam is analyzed.

The advanced spam options have some additional controls that can be turned on/off, or placed in test mode as way to measure the impact of turning them on. The first set of controls will increase the spam score for an email if the condition is matched. This doesn’t mean that the email will be marked as spam, but it will increase the likelihood. The conditions are
- Image links to remote sites – these are commonly used in email signatures, so increasing the spam score might result in more false positives if the sender has other issues with their mail. If you start to see too much missed spam with remote images, then you should turn this on.
- Numeric IP address in URL – I always turn this on. It can cause problems with things like UPS alert emails, but those can be fixed in other ways such as connection filtering or mail flow rules.
- URL redirect to another port – I always turn this on, there’s no good reason for regular users to be clicking links that go to non-standard HTTP ports. Again, this might cause problems with systems that use non-standard ports for admin interfaces, if they happen to send emails containing links to those URLs. But that can be fixed in other ways.
- URL to .biz or .info domains – these are almost never legitimate websites, so I find it safe to turn this option on.
The next set of controls will mark an email as spam if the condition is matched. The conditions are:
- Empty messages – I enable this option on the basis that an empty message is useless anyway, so there’s no real risk of blocking legitimate email.
- Javascript or VBScript in HTML – I always turn this on. Active content is too risky.
- Frame or iFrame tags in HTML – I always turn this on.
- Object tags in HTML – I always turn this on.
- Embed tags in HTML – I usually turn this on. Most of the time it isn’t a problem, but if you’re concerned about some edge case of embedded media being blocked then you should try this one in test mode first.
- Form tags in HTML – I always turn this on.
- Web bugs in HTML – I always leave this turned off. Web bugs are basically remote images, a single pixel in size usually, that let a sender know whether an email has been opened. Most clients block remote image loading by default anyway, so web bugs are not entirely effective, but they’re still widely used for legitimate emails.
- Apply sensitive word list – I usually turn this on as I’ve never had an issue with spam being blocked due to the use of “sensitive” words. If “sensitive” words are a normal part of your email communications and you’re unsure of the impact of this setting, then you can just try it in test mode for a while first.
- SPF record: hard fail – I like to turn this on, but in some industries and small business sectors there is still a huge shortfall in proper use of SPF and other measures. There is no test mode for this setting, so if you prefer to err on the side of caution, leave it turned off.
- Conditional Sender ID filtering: hard fail – if the SPF setting is on, turn this on too. If not, leave it off.
- NDR backscatter – if you use Exchange Online for outbound mail then this is not required to be turned on at all. If you have outbound email from on-premises servers that does not route via EOP, then you can turn this on.
If you’re using any settings in test mode, you can choose an action to take on messages that match those conditions. Sending a Bcc message to another mailbox is the simplest way to keep an eye on hits for your test mode items.

Finally, after configuring your desired spam filtering options, if you have enabled the quarantine action for spam, you should configure the end-user spam notifications.
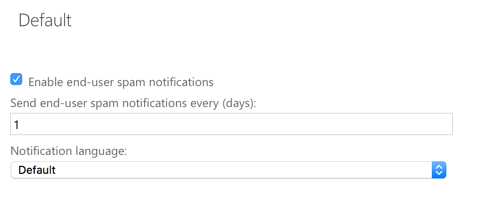
I prefer to leave the notifications to be sent every day, but as you get your EOP settings tuned for greater effectiveness over time, and your users tell you that the spam notifications do not contain any legitimate email, then you can consider reducing the frequency of the notifications to every 2-3 days.

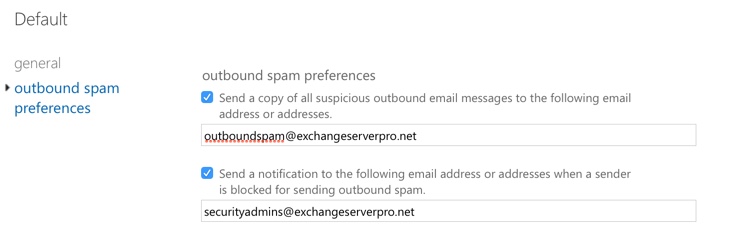
Configuring Outbound Spam Preferences
Exchange Online Protection will detect and block outbound spam, which is spam that is sent by users in your own organization. Most of the time the spam is not intentionally being sent by your own users, but is being sent by someone who has compromised one of your accounts. Other times the spam is due to an over-eager marketing person using Outlook to send bulk email out to the world, which is a bad idea.
In the outbound spam preferences you can set notifications so that you receive a copy of any suspicious outbound email. I usually find the email is not actually spam, but has some spam-like characteristics like awkward phrasing or an invitation to click on a link to login somewhere. A little user education can usually prevent those incidents from being repeated.
You can also configure a notification for any time one of your senders is blocked for sending spam. This is almost always an account compromise, as I mentioned earlier, so make sure these alerts are going to people who can take prompt action.
Additional Steps
So far we’ve covered the basic features of Exchange Online Protection. After you’ve taken those steps to configure EOP, there are some additional items to look at. One of them is DKIM, which I’ll explore in a separate article in future. The others that I recommend are:
- Deploy the Junk mail reporting add-on for Outlook, and train your users and help desk how to report junk email to Microsoft in Outlook and OWA.
- Familiarize yourself with quarantine management.
- Bookmark to the anti-spam headers reference, as you’ll be using it a lot.
- If you are in a hybrid environment, configure the transport rules in your on-premises Exchange org for handling email marked as spam by EOP.
- Add mail flow rules to mitigate other email threats.
- For even more effective email filtering, look at Advanced Threat Protection.
Photo by Patryk Grądys on Unsplash


Has someone been able to update the Hosted Connection Filter IP Allow List or IP Block List using a csv file? I have tried but does not seem to work and I believe the built-in “Set-HostedConnectionFilterPolicy” does not allow it
https://docs.microsoft.com/en-us/powershell/module/exchange/antispam-antimalware/set-hostedconnectionfilterpolicy?view=exchange-ps
I have a list of 200 random IPs I need to add to my IP block list and I am stuck
Please help!
Thank you
Thanks for the article! Any idea if the filters are applied in the order they are displayed in the EAC. For example, does a message run through the malware filter, then connection filter, then spam filter? Does the message run through mail flow rules before it hits these filters?
Buen día,
Existe alguna opción para que el usuario final reciba una notificación tipo push al momento de que le llegue un correo y al ser catalogado como spam se lleva a la cuarentena.
Algo como lo que hace Notifier de Spamina?
Saludos
Thank you for any insight guidance
Regards
Christos Petropoulos
Hello Paul,
The article is very helpful, we have an Hybrid on premises infrastructure, is there a way to mark spam emails from 365 and not move them to junk folder and at the same time not disabling the Junk Mailbox automatic filtering?
We have a 3rd party anti-spam service and it works fine, 365 though is still getting a lot of false positives. I am trying to catch emails that 365 categorizes as spam to be delivered to the users inbox with a prepend subject line with text, and at the same time the spam emails from the 3rd party to be delivered normally to the junk folder. 365 catches these mesages as well and places them on the inbox. When an email arrives do the mail flow rules trigger first or the anti spam service?
Hey guys
Can someone please help me confirm this?
Which takes precedence: user’s safe sender list or EOP spam filter marking them as confident SPAM.
For well known senders (company related ones), I would not have hesitations to add them to the “organizational allowed list” but for personal sender like blah@gmail.com I rather advise users to add them to their safe sender list if they must (would prefer they keep those communications outside of corporate but sometimes you can’t win)
Thank for your comments/insights
Cheers
Carol Ostos
What are the Virus n span engines used fir EOP filtering?
We’ve got an internal disagreement concerning EOP & multiple Spam Filters. On one side we have people that believe the filters will aggregate. I.e., if multiple different Spam Filters apply to an incoming message, all will be applied, and the Priority will affect in which order they are applied. So the last to act on the message will overwrite settings imposed by the earlier.
The other side believes that only one spam filter will be applied. The first that matches the incoming message will be applied, and no others will ever come into the picture.
I can’t find anything online that covers this question.
Can you answer this?
Thanks!
From https://technet.microsoft.com/en-us/library/jj200684(v=exchg.150).aspx
“You can edit the default spam filter policy to configure your company-wide spam filter settings and create custom spam filter policies, and then apply them to specific users, groups, or domains in your organization. Custom policies always take precedence over the default policy. You can change the order in which your custom policies run by changing the priority of each custom policy.”
I think that can be interpreted either way. So to answer your question I suggest you set up a test scenario.
Add an external address to the sender allow list of the default policy. That will mark the mail as SCL -1.
Add another external address to the sender block list of the default policy.
Then create a custom policy that applies to a specific recipient. Allow up to 1 hour for the custom policy to take effect.
Use the external addresses to send email to the specific recipient that the custom policy applies to. If the sender allow/block lists from the default policy still apply, then you can conclude that the policies have been assessed in a cumulative manner.
So i tested this. I did the following:
1) Sent an email from myself to my other office 365 tenant, the message went through the on-prem infrastructure. (Centralized Transport).
2) I confirmed that when the message was sent, the SCL Rating was not set to -1, also the Antispam report did not show “SKN” as one of the values.
3) I then whitelisted our on-prem enviornment, in office 365, connection filtering.
4) Then i sent myself an email, as expected the message was marked as not spam, SCL -1, and SKN for the report.
5) Then i created a custom antispam policy, and set it to my account as the “applies to section”.
6) Sure enough EOP is completely ignoring my rule, it seems that if you whitelist an source IP (Connection filter), all messages from that Source IP bypass the antispam engine completely.
So basically it doesnt work. I was really hoping to enable to some additional Anti-Spam filtering for a specific user of users. guess not this way, also if you try to create a transport rule to change the SCL rating from -1 to anything it fails.
Robert
Hi Paul,
with the recent hype around GDPR we wanted to have a mailbox to receive GDPR related mails (unsubscribe, forget people, etc) – but we noticed some of the exotic email domains are categorized as spam by EOP. With on-prem anti-spam you can opt-out spam filtering for specified recipients – I cannot find such option in O365, am I missing something or that feature is not available?
Thanks, Marcin
Nevermind – found it finally. For anyone looking for the same, you need to create additional custom spam policy and there is a applies to option where you specify users. It doesn’t work for DLs!
One reason we’ve stayed with a 3rd party scanner is their ability to configure a daily quarantine summary for end users that’s delivered at a specific time. Any plans to do this with EOP?
Daily summary is available now. Specific timing isn’t configurable though. You can say how often you want it sent (e.g. every 1 day, every 3 days), but not the specific time of day.
Specific timing is what we’re looking for, our users have become accustomed to checking daily quarantine messages 9am each morning.
Can EOP do address re-write as only Edge server supports this on-prem?
No, EOP does not do address rewriting. You can use conditional mail routing to route mail through an on-premises connector if you need to route through an Edge for address rewrite though.
Paul,
you are the best. Thanks for the great article.
We’ve recently moved to EOP as our mail security platform. One of the biggest challenges we’ve faced is with bulk mail filtering and the implications for the high confidence spam action. We have found that if we select to mark bulk mail as spam, anything with a BCL above the threshold is marked with a resultant SCL of 9.
Based on feedback from our users we had moved to a BCL threshold of 4, but this was capturing some legitimate business mail as well. We have a preference to delete high confidence spam, but this wasn’t possible with some legitimate mail getting a resultant SCL of 9 based on the BCL.
To work around this, we are no longer marking bulk mail as spam. Instead, we have created a mail flow rule to inspect the X-Microsoft-Antispam header which is applied before content filtering. We are looking for “BCL:[4-9]” in this header, and assigning an SCL of 5 if found. As we are deployed this will result in bulk mail delivering to the junk mail folder, and allows us to determine if we can safely delete messages that are organically scoring an SCL of 9.
Curious to see if anyone has thoughts or feedback on this approach?
Sounds like a good approach to me. Every org is different, so it’s important to tune things the way that works best for yours.
Paul, we are planning on requiring users to utilize their Safe Senders list and want to make sure SPAM is routed correctly. Is there anything special that needs to be done with our hybrid configuration? I was reading about needing a new transport rule created on our on-premise server and want to make sure this is needed.
Thanks.
EOP will add a header to your messages that it detects as spam if you are forwarding the message to the Junk Email folder. For your hybrid setup, where mailflow (aka MX) is EOP first, then the mailboxes on-premises need three transport rules to say “if junk put in junk email folder”. The three rules are specifically for different headers, and they relate to different classifications of junk. One is personal block lists, one is spam content filtered and the last is any other spam filtered message. Bulk emails can be added as a fourth rule.
The article I wrote in 2013 at http://c7solutions.com/2013/09/moving-exchange-online-protection-junk-html is still valid for this
At the end of the article is a link to the TechNet article for the transport rules that a hybrid environment needs.