Introduction to our IP Address Management Solution
In this blog post, we will utilize Microsoft’s Power Platform to streamline and enhance the internal IT management process. If you own Office 365 licenses and have access to SharePoint, PowerApps, and Flow, you will be able to follow this blog post and design a custom IP address management solution without a development background.
IT departments try to find an efficient, automated, and streamlined way of completing day-to-day tasks but not all have a dedicated development team to design and develop internal custom solutions. Microsoft is empowering non-developers with tools that help to achieve their desired goals.
Today, we have a goal to help Network Administrators to enhance and streamline IP address management systems. Working with networks and subnets, IT professionals always keep track of all internal IP addresses and their utilization. Almost every environment has some sort of IP address management system. In today’s blog post we will modernize IP address management and the IP address request process.
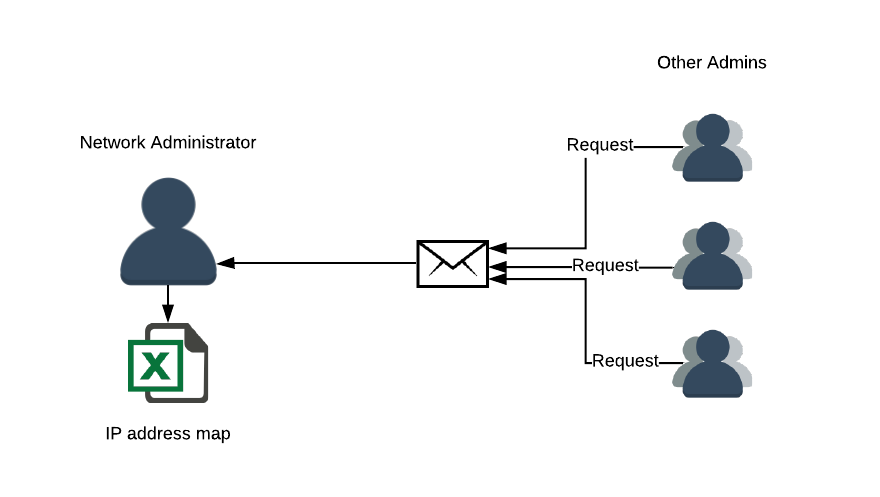
Let’s look at the problem, (legacy approach):
We have a Network Administrator who keeps an excel spreadsheet tracking all IP addresses utilization. The main issues with the legacy approach are lack of transparency and cumbersome IP address request process.
Now, let’s look at how we’re going to automate the manual processes to solve the problem and save IT Admin’s precious time.
To fix the problem, we will need a centralized database of all IP addresses with an ability to view them on demand by any Network Admin as well as an automated process of requesting IP addresses from a mobile device. The diagram below demonstrates the high-level overview of what we are going to achieve by the end of this blog post.
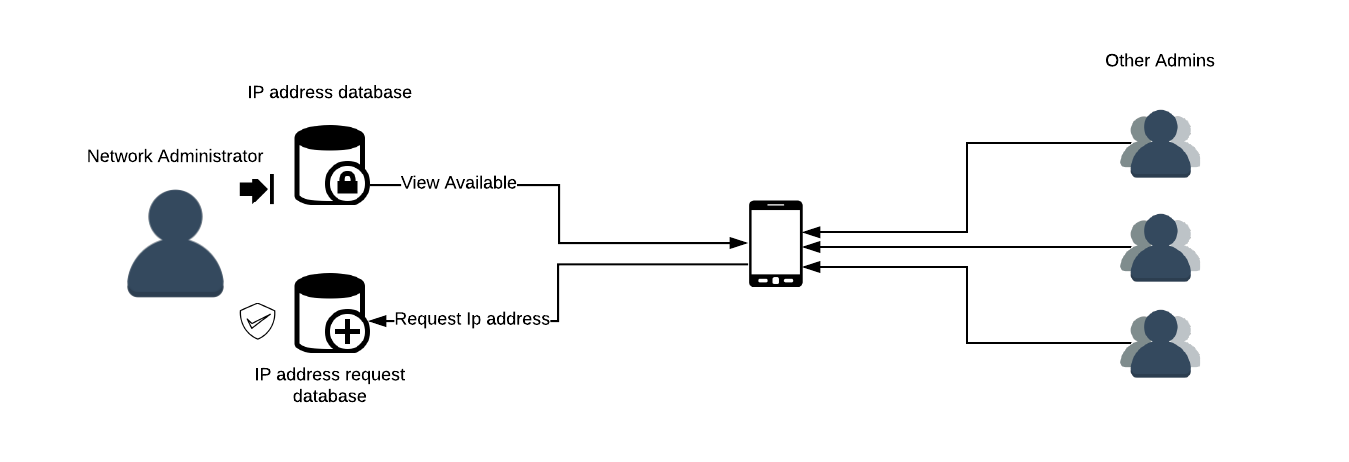
As you can see in the diagram above, Admins can access the IP address mapping system without Network Administrator intervention, as well as have an ability to request IP addresses right from their mobile device. On the other hand, the Network Administrator will have full and
Now we understand the problem and have the desired solution in mind, the next step is to identify all the required pieces in the development process. We are going to be using three main components in our solution:
- Backend: The place where we will be storing our data such as IP address information and IP address requests. Basically, you can utilize an Excel spreadsheet, SQL database or CDS entity to store IP address information. But in our example, I am going to be using a SharePoint online list.
- Frontend: We will be designing a user interface to communicate with the Backend to retrieve IP address information from the SharePoint list and submit requests for approval. To design the user interface and provide an ability to access it via a mobile device, we will be utilizing PowerApps.
- Workflow: To trigger automated emails and update Backend data based on user’s input we will be using Microsoft Flow. Microsoft Flow is a powerful workflow engine that is available as part of Microsoft’s Power Platform.
Let’s dive deeper
Backend
Our IP address management system’s data will reside in a SharePoint list. We can utilize SharePoint Team Site to create a list. You will need to have access to create SharePoint list, you can request access from your SharePoint Admin.
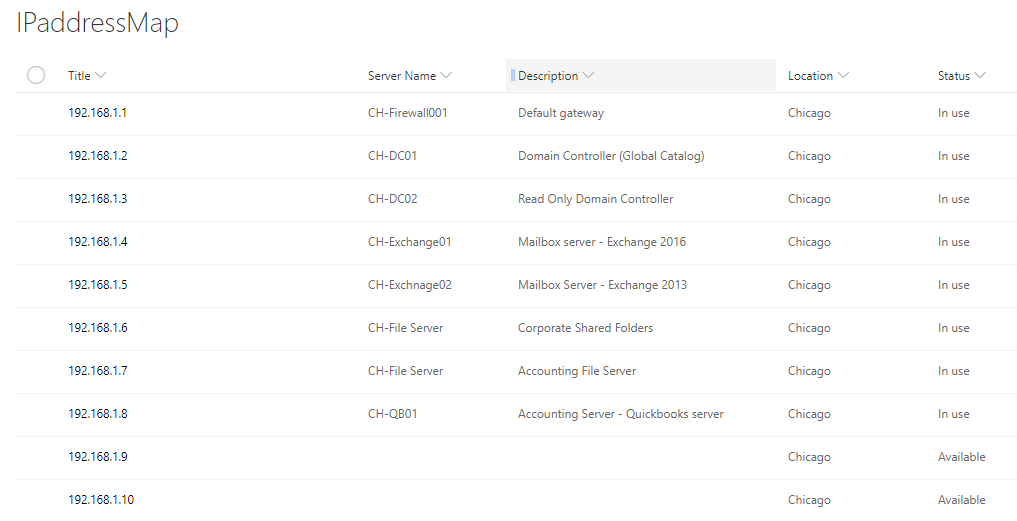
Generally, you will need to create two SharePoint lists, one to store IP address mapping (IPaddressMap) and the other to store and monitor all requests (IPRequestList).
To learn how to create SharePoint lists, follow Microsoft’s documentation here.
This is an example of the list that I created for this blog post. You can add additional columns based on business requirements.
If I navigate to
SharePoint columns
| Column name | Column type |
| Title | Singe line of text |
| Description | Multiple lines of text |
| Location | Choice (Chicago, Atlanta, Dallas) |
| Status | Choice (In use, Available) |
Location is a choice field with “Chicago”, “Atlanta” and “Dallas” options. Status is another choice field with options “In use” and “Available” Permissions must be applied based on your business needs. In general, IT Admins should have read-only, and Network Administrator should have
Next, let’s create a SharePoint list which will hold all requests from other Admins:
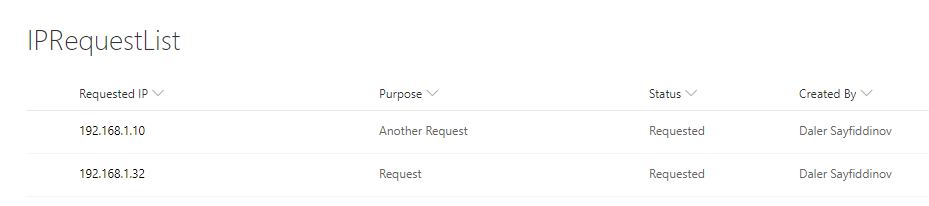
This list consists of columns below:
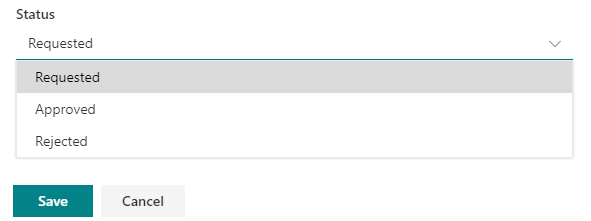
| Column name | Column type |
| Requested IP | Single line of text |
| Purpose | Multiple lines of text |
| Status | Choice (Requested, Approved, Rejected) |
Follow Microsoft’s documentation on how to create SharePoint columns.
Frontend
Now we are ready to design the user interface to view IP addresses available and provide the ability to request one.
Navigate to
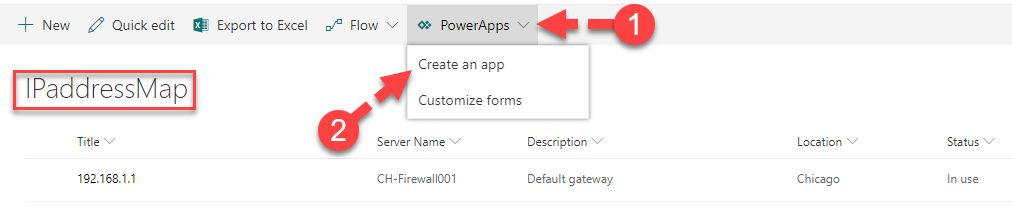
To create an app right from SharePoint list, you will need to specify the name of the app and wait until PowerApps builds the core of the application.
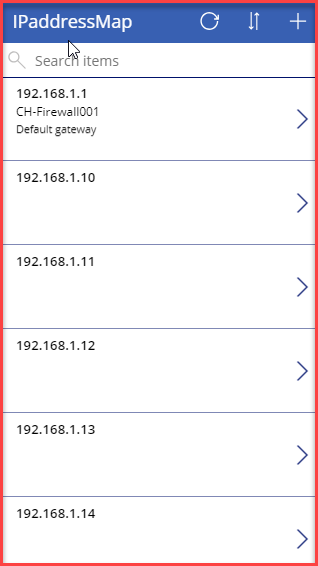
After PowerApps completes building base screen of the app, you should see the screen below:
Applying basic design changes to the app
In the next few steps, I will demonstrate how to customize app design to make it relevant to the business requirements. All the changes that are demonstrated below are the minimum needed to accomplish the desired result. You can make additional design changes to meet your own business requirements:
- Header text change to “IP address map”: Double click on the text and make required modifications.
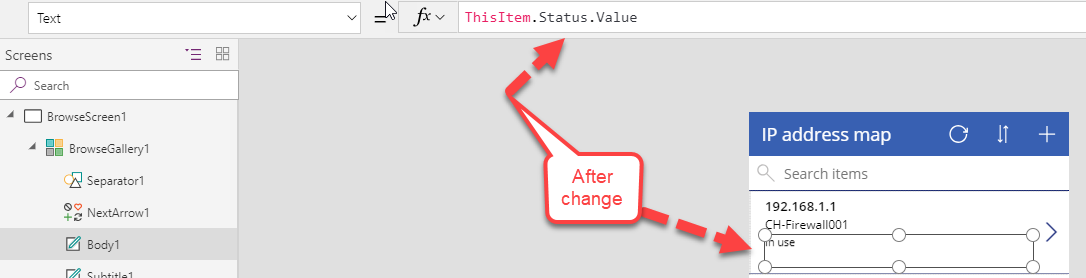
- Change the layout of the fields that we show in the card: I need to show
IP address, Server name, and Status. I already have two out of three that I need. I am going to replace Description field withStatus field. When you work with PowerApps galleries, make sure that you work with the first item in the galley which replicates changes to all items in the gallery.
Click on the Description field and change the property in the formula bar to

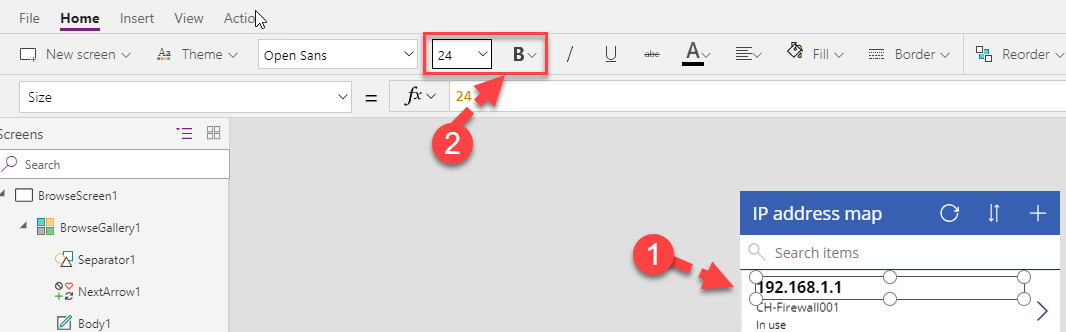
- Make some visual modifications such as IP address font weight and size: Select IP address and apply changes using Home ribbon options.
After making design changes, we will start building the app logic. First, let’s change search behavior as well as sorting the IP addresses in the gallery. Based on the requirements, we should be able to search by IP address or description.
To achieve this requirement, highlight the gallery and paste below code into the Item property of the gallery:
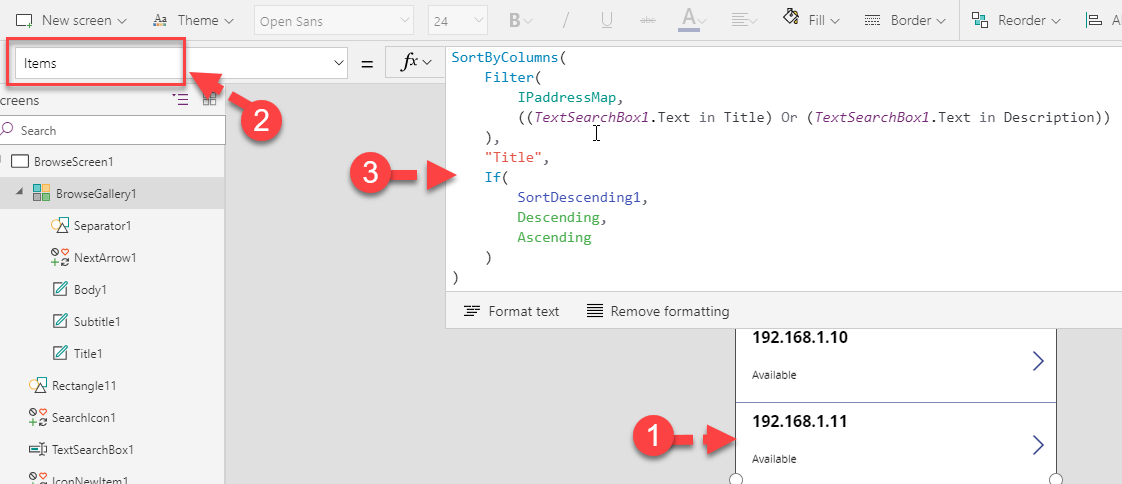
SortByColumns(
     Filter(
         IPaddressMap,
         ((TextSearchBox1.Text in Title) Or (TextSearchBox1.Text in Description))
     ),
     "Title",
     If(
         SortDescending1,
         Descending,
         Ascending
     )
 )
IPaddressMap – SharePoint list data source
Title – SharePoint column where we store IP address value
Description – SharePoint column where we store the description value of the IP address
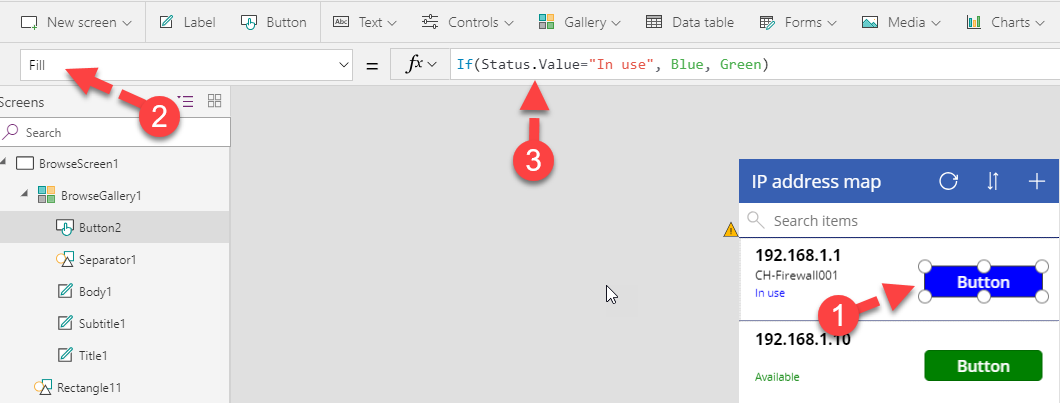
Now let’s make some visual changes to the Status field. Requirements are to show “In use” status in green color and “Available” in blue. To achieve the requirements, highlight Status text field in the formula bar and change property to Color and paste the code below:
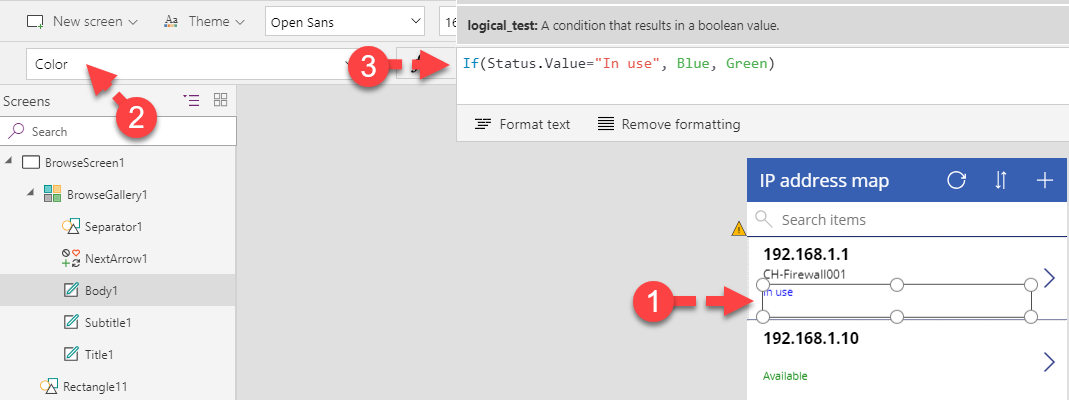
If(Status.Value="In use", Blue, Green)
Next, we are going to design a dynamic button which will show the details of the IP address if it is in use or submits a request if IP address is available. Before we start designing dynamic button, let’s connect second SharePoint list data source to store IP address requests.
Click on View, Data sources, Add Data source. Choose SharePoint from available data sources and paste the URL of the team site where SharePoint lists are created.
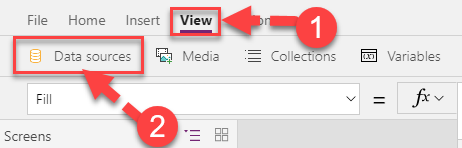
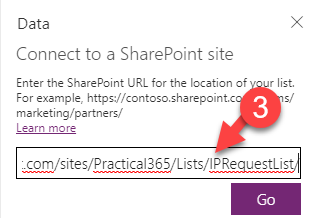
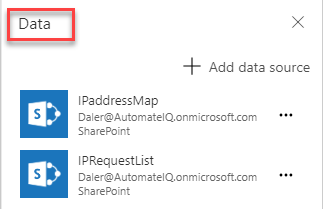
In the next screen select, IPRequestList list and click Connect. You should see two data sources in the Data pane.
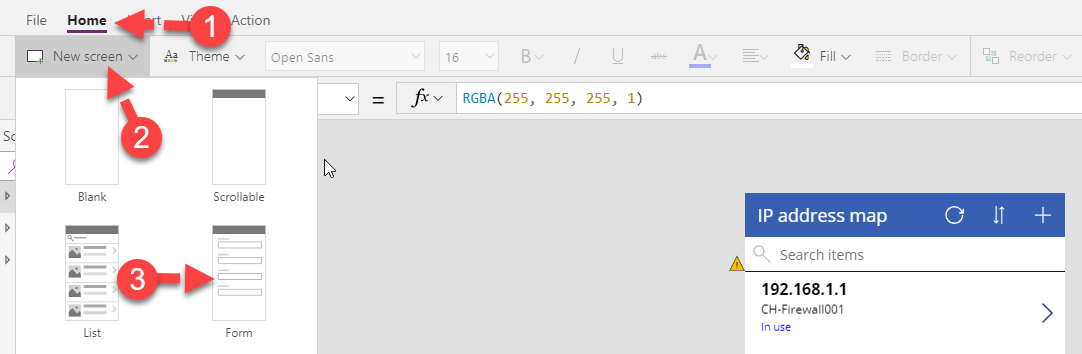
Now, we have to add an additional screen for IP address request form. In the top ribbon, select Home and click on the New screen. From the available templates, select Form screen template:
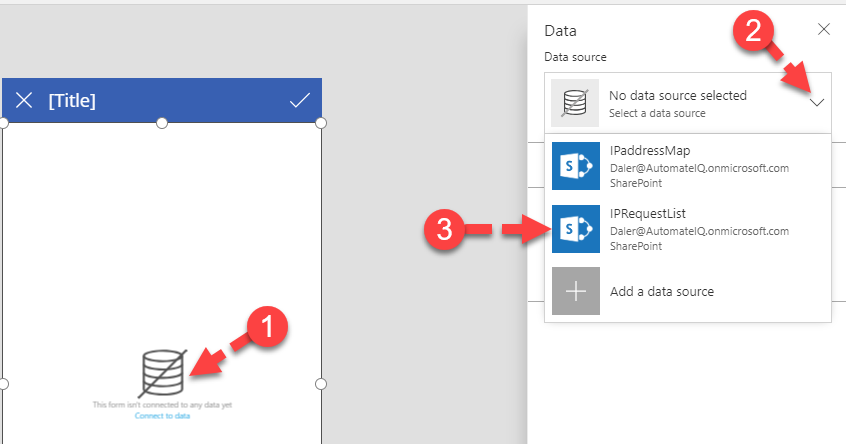
Next, we will have to connect this screen to the data source. Click Connect to data and select a data source.
After completing these three steps, you should see a similar screen:
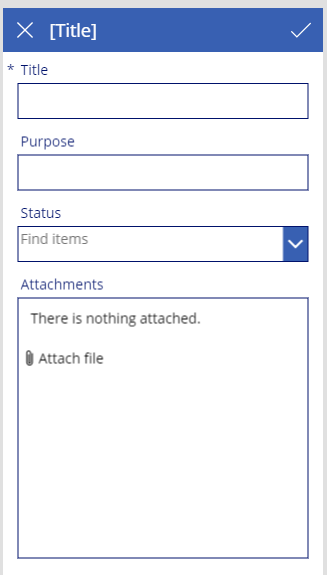
We will have to make some adjustments. First, we will rename the screen to RequestFormScreen and hide unnecessary fields, such as Status, and Attachments.
In the Screens pane double click on Screen1 (generic name) and type RequestFormScreen.
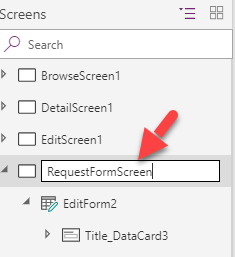
Next select EditForm2 (generic name), IPrequestList and uncheck Status and Attachments to hide this fields from the form.
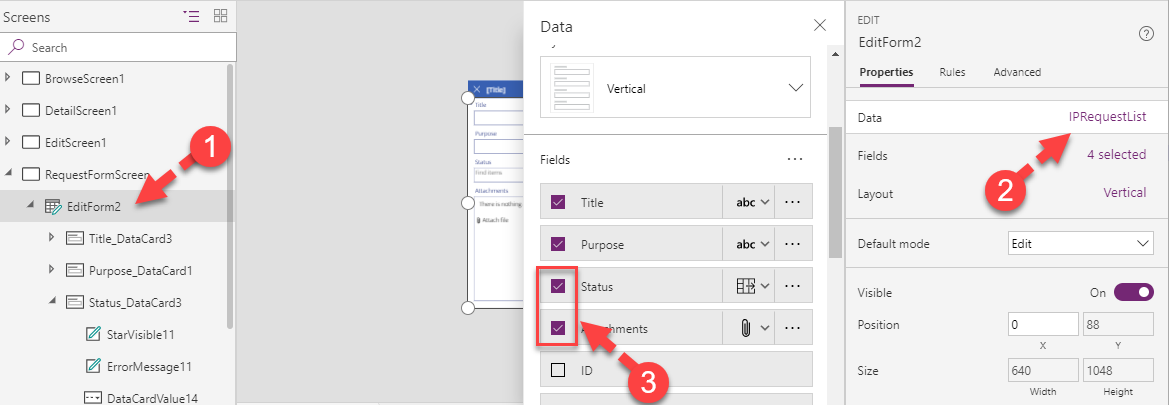
While in the Data pane, change Purpose text field to multiline text field.

We will also need to change the form type to New. Select the Form and change DefaultMode to New.

Change OnSelect action for (X) button to Back();
Also, let’s place a nice big Submit button. Select the form and from the ribbon select button. Change the text of the button to “Submit Request”. OnSelect action should submit the request (creates a SharePoint list Item), reset the form and navigates to a success screen. Success screen is not created yet; we will do it after we set OnSelect action.
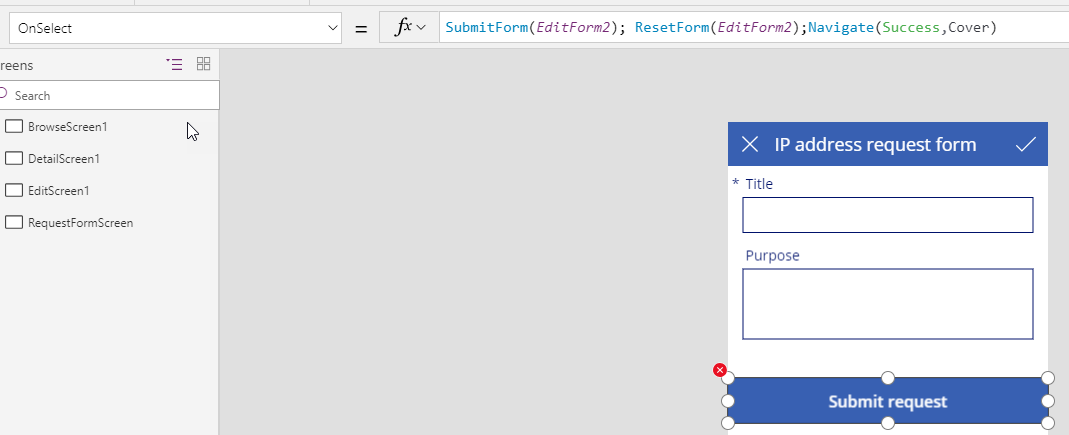
SubmitForm(EditForm2); ResetForm(EditForm2);Navigate(Success,ScreenTransition.Cover)
The PowerApps will complain that something is wrong and the reason is that the Success screen does not exist yet. You will see the red “X” right on the button. Let’s fix it, click on New Screen and from the templates available choose Success screen template. After the screen is added, rename the screen to Success.
As soon as you add and rename the screen error alert should disappear.
Now we are ready to go back and design the button which will have:
- Dynamic button text
- Dynamic OnSelect event
- Dynamic color
Note: For production apps, it is best practice to rename all the screens and cards in your app for better documentation.
In the BrowseScreen1, select the first item in the gallery and insert button. You can delete the default View details button (>).
We are going to write a
If(Status.Value="In use", "View details","Request IP")
And the most important is OnSelect action of the button. The logic is:
If IP address is available, on click, navigate to DetailScreen1.
If IP address is in use, on click, navigate to RequestFormScreen.
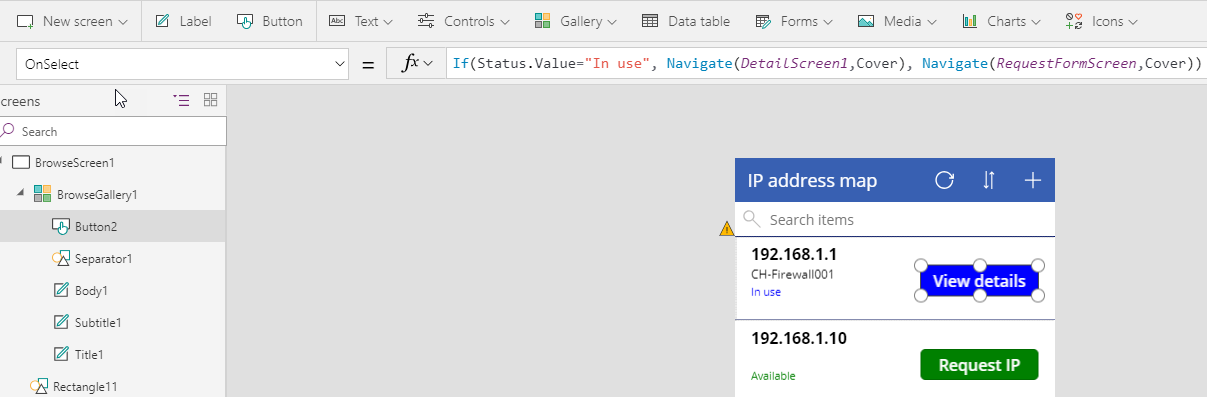
If(Status.Value="In use", Navigate(DetailScreen1,ScreenTransition.Cover), Navigate(RequestFormScreen,ScreenTransition.Cover))
We will need to make sure that when the user clicks on
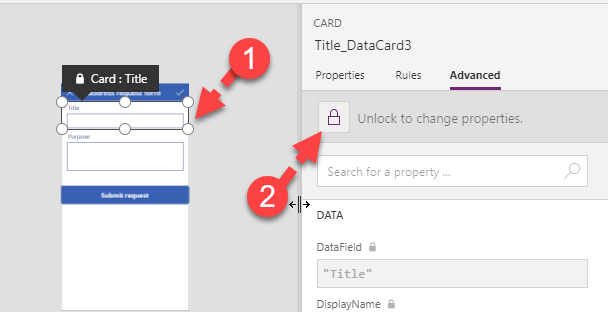
After the field is unlocked, let’s change the default value to the code below:
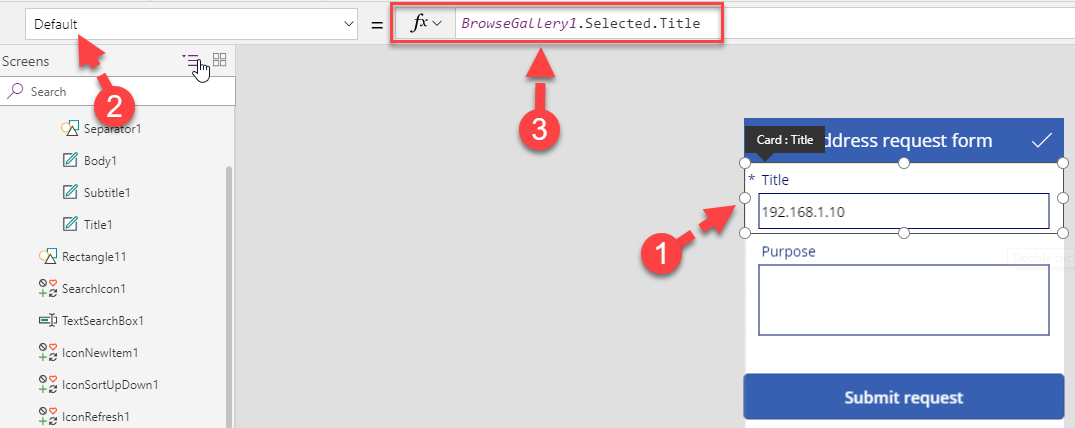
BrowseGallery1.Selected.Title
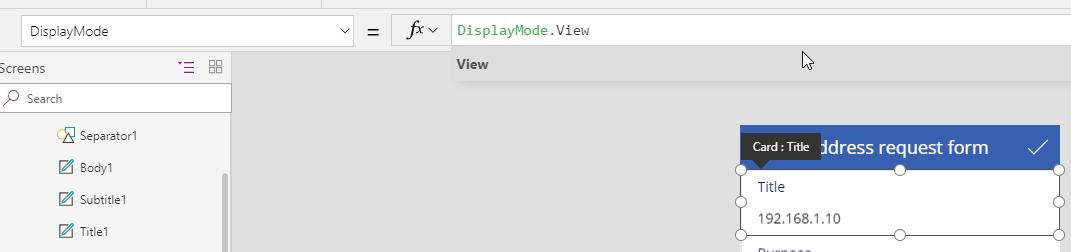
This code places the value of the selected Item’s Title (which is the IP address) to Requested IP address field of the form. For protection purposes, we will lock this field that users can’t change the value. While the card is selected set DisplayMode to View.
Lastly, let’s build a feature to let users know that certain IP address is already requested by someone to eliminate double requests.
If requested, we will mark the IP address using
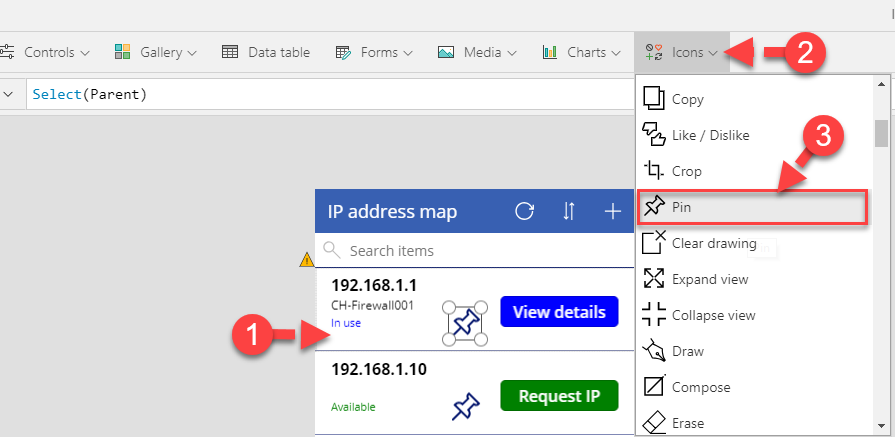
Now we need to program the icon to be visible if someone already requested this particular IP address. Select the Icon and paste below code:

If(CountIf(IPRequestList,'Requested IP' = Title1.Text And Status.Value="Requested")>0,true,false)
We are now finished designing IP address application. The last step is to build the workflow.
In part two of this blog, I will provide a step-by-step guide of how to create a workflow for your IP address management solution in Microsoft’s Power Platform.


Hi Daler, excellent article thank you. Is it possible to share the code for the solution?
I’m having issues with the buttons where the If(Status.Value=”In use”, “View details”,”Request IP”) is generating an error due to the syntax. Can you provide any feedback.
If(ThisItem.Status.Value=”In Use”, “View details”,”Request IP”)
seems the syntax changed.
Pingback: Декабрьские мысли – IT in realworld
Pingback: How to enhance IP address management using Microsoft’s Power Platform - Part Two